
Of all hydroponics systems, Deep Water Culture (DWC) – also commonly known as bubbler systems or bubbler buckets is comparatively cheap, reassuringly simple and hugely effective.
Nowadays there are loads of different ways to grow your plants hydroponically – NFT, Flood & Drain, Drippers, Aeroponics and so on! When used correctly, the growth rates and yields that this technique can achieve are phenomenal. And that’s not all! DWC is very cheap in comparison to other options, offering simple, DIY setup beginners and more established growers both appreciate.
so no wonder more and more people continue to explore the option of Deep Water Culture (DWC) as a growing method.
Table of Contents
How exactly does DWC work?
1. Basic Deep Water Culture
As its name implies, the roots of the plant are submerged in “deep water” nutrient solution that is aerated by the air pump. Without vigorous aeration, submerged roots would rot and die – but when the bubbles are constantly present some surprising results often transpire!
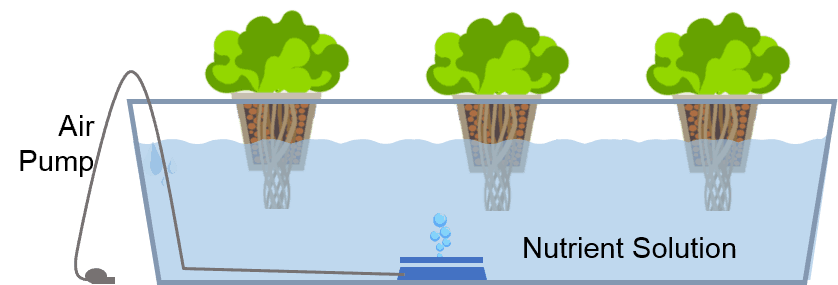
The net pot is suspended over a nutrient-rich solution that is aerated with an air pump attached to an air stone. As the plant grows, the roots will travel through the Hydroton and net basket and grow directly into the nutrient solution thus providing the plant with a perfect ratio of nutrients and air to promote vigorous root and plant development.
2. The Kratky Method
Deep Water Culture without any pump is known as the Kratky Method. This is the most basic type of hydroponics with minimal equipment and without any use of electricity. In this passive system, you leave space for air between the water (nutrient solution) surface and plants’ roots. The roots are partially exposed to the air for oxygen while the remaining parts of roots are immersed in the solution to get nutrients.
This method works best with fast-growing leafy green plants like lettuce, spinach, and herbs. It’s not efficient for larger fruits bearing like tomatoes, peppers, and cucumbers. You will need a large container and more frequent monitoring to grow plants that tend to grow larger. It is important to ensure and maintain the right amount of nutrient solution for water and oxygen access to the roots.
3. Bubbleponics
Bubbleponics takes the same idea of basic DWC (Deep Water Culture) with extra top-feeding/top-dripping where nutrient solution from the reservoir is pumped directly over the seedling’s roots. The top-feed enhancing growth significantly in the first 2 weeks when your plants have just sprouted. Many cannabis growers use this technique as the roots get easy access to water from the beginning this way.
As soon as the roots hit the solution, Bubbleponics growers disconnect the top feed but keep the water pump on 24/7 in the reservoir to make a recirculating DWC system which is our next type of DWC.
It worked out so well that now I have water pumps in the bottom of all my reservoirs for recirculation
4. Recirculating DWC System
If you plan for a larger DWC system to grow multiple plants in multiple containers, you must set up a recirculating system. As, checking each isolated DWC system individually can be very tedious and time-consuming for pH, nutrient levels, and topped up with lost water.
Moving the water around not only increases the reservoir volume size but also helps to collectively maintain nutrient density, water pH and oxygenation. The constant water circulation diffuses any mineral concentrations or buildup of acidity throughout the entire water supply in numerous smaller systems.
Pros of DWC
The roots of plants have greater exposure to oxygen that favors root development and overall plant growth. The good aeration substantially enhances the water uptake, nutrient absorption, and cellular growth. It also prevents stagnant water that can result in several root health issues like rotting and pythium.
Cons of DWC
As with every growing system, there are a few drawbacks!
- The pH in the reservoir frequently fluctuates as the plants absorb the nutrients over time.
- For some system designs, you will need to lift the lid having plants to add nutrients and water in the bucket that can be hazardous to mature plants.
- Frequent attention is needed to ensure the availability of the right amount of nutrient solution to plants
- The air pump failure can kill plants, as constant aeration is needed to keep the submerged roots alive.
Parts of DWC System
A DWC system consists of a bucket (reservoir) with a lid, net pots, an Air Infusion Pump, Air Line, and an Air Stone. You may also need a water pump, timer, pH testing kit, and foliar feeding.
1. Bucket (Reservoir)

2. Air stone & Pump

However, you also need a water pump in a Bubbleponics setup to push water up to the plant’s roots and in a recirculating system to pump the water through several reservoirs. The airstone and the water are kept on for 24 hrs/day.
Are you stuck on what the sized water pump your system needs? Check this ultimate guide about the best hydroponics water pump and timer setup here
3. Net Pot

4. Growing medium

Read more about a list of 17 growing media used in hydroponics here.
Important factors in growing with DWC
1. Reserviour size
The size of the reservoir is important, as it determines how frequent monitoring and changes in pH and nutrients occur. The DWC has a lot more nutrient solution available to each plant as compared to a suggested minimum of 0.25 L/plant for NFT (nutrient film technique) systems.
You can do some calculations to determine the size of the pump and reservoir that is suitable for your system. If the volume of your plants’ container is 5000 gallons, you will need to run a pump with 1000 gal/hr rating for 5 hours to turn this over. In turn, the pump will turn over your reservoir of 250 gallons 4 times per hour, with a residence time of 15 minutes.
Considering the density of each plant about 20 plants/m² and the surface area of your container is 50 m², you will have 50 x 20 = 1000 plants in your system. That is, for a total solution volume of 5000 + 250 = 5250 Gal, your volume per plant is 5,250/1000 = over 5.25 gal/plant. More this value is, more your system is stable with lesser prone and slower to change.
2. pH
pH control could be more difficult, so I suggest that if your pH drifts, you change the ammonium content of your formulation to offset any drift. Alternatively, find out how much acid you need to add to stabilize pH and add this to your fertilizer mix, rather than adding separately. You must use the pH test kit to check and adjust the pH if the level is too high or too low.
3. Dissolved Oxygen
You should not shut off the air pumps in your system unless you have a huge water volume per plant. Shutting off the recirculation pumps has the risk of you getting significant oxygen depletion overnight. Nevertheless, I would recommend that you do some pumping overnight in case there is stratification within your growing tank. Perhaps have four sessions of pumping for a half hour each, giving a total of two hours, which would turn over your tank once overnight. In particular, this should help maintain some water movement within the tank.
4. DWC Water Temp Control
The water in DWC bucket absorbs heat, raising the water temperature. Once the temperature of water gets above 68–70 degrees, plants run a very good chance getting root rot. Nothing worse than seeing the brown slimy roots eventually killing your plants. In summers with 90 degrees outside, water in the bucket placed in a room or outside will warm up.
If you are just using 5-gallon buckets or less, you may be alright depending on air temperature near your water. If you are using a big container or bed with of water, the best investment you will ever make is a water chiller.
How do I make my own DWC system?
Bubblers are incredibly easy to assemble – just follow our instructions below.

- Cut a hole in the center of your bucket lid that will accommodate the net pot without letting it fall through. If you use the 14.4cm Heavy Duty Net Pot – which we recommend – your hole should have a diameter of 132mm. This will support the pot securely and eliminate the possibility of it slipping through at a later date. If you are using a different size pot cut the hole to suit but make sure that this isn’t too big. As your plant grows, its weight will increase and the possibility of the pot falling through the hole increases.
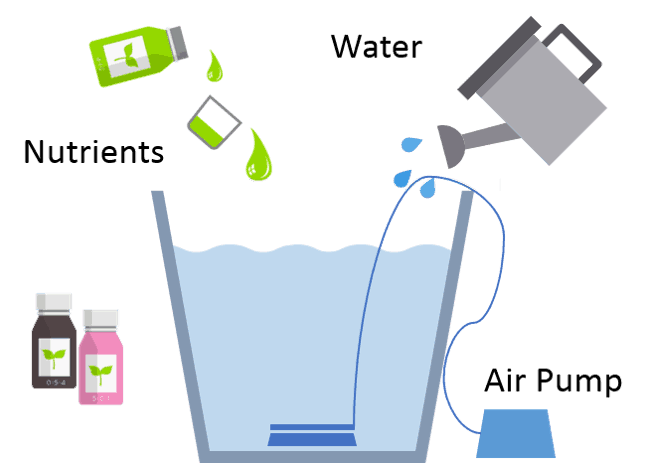
- Fill your bucket approximately 2/3 full with pH adjusted ½ diluted nutrient solution. Position your air stone on the base of your bucket and attach them to an Air Infusion Pump using airline.
- Start your air pump. The right level of air infusion for successful DWC growing will cause your nutrient solution to grumble and churn with the volume of bubbles.
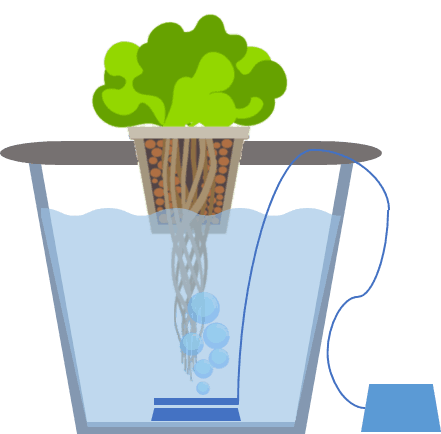
- Transplant a rooted cutting into the net pot using clay pebbles as your growing medium.
- Replace the lid of your bucket and insert your net pot (containing your cutting) into the hole.
- At the beginning stage, the plant will need hand watering until its roots grow down into your nutrients. Once this has happened (usually within the first week) you will no longer have to hand water the plant.
Best DWC Systems in the market
| Image | Product | Features |
|---|---|---|
 | 5-Gallons Deep Water Culture Kit Check Price Here |
|
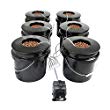
 | 4-Buckets Deep Water Culture Kit Check Price Here. |
|
 | 3.5-Gallon Deep Water Culture System Check Price here |
|
 | 6-buckets DWC Hydroponic System Check Price Here. |
|
 | 8-bucket Deep Water Culture Kit Check Price Here |
|
There are some fully automated indoor hydroponic kits using which you grow plants easily and quickly. Read more about these hydroponics indoor kits here.
Draining
The major choice you face is when to drain. This will mainly depend upon the quality of your raw water, especially its sodium chloride (NaCl) content. Because of the very high volume of nutrient solution per plant in the system, it should take a long time before it would be necessary to drain. If the sodium content is under 23 ppm, then you may never need to discard. The higher the ppm Na, the quicker it builds to unacceptable levels.
As you suggest, trying to discard the full volume of grow tank is basically unworkable. You obviously can’t lower the level in the grow tank, so you would need to pump through to displace the old contents with fresh nutrient solution (not straight water). To even be a possibility, this would require automatic EC control in the control tank. Even then, this gives a huge volume to handle, plus the flow through the grow tank would not be ‘plug flow’, but there would be some mixing of old and new solutions.
This leaves the only feasible option to be ‘bleeding’. That is, taking off a small proportion of the overflow on a continuous basis. This happens unknowingly in many recirculating systems through leaks.
An occasional analysis would indicate how much you need to be bleeding. Try to maintain the Na level no higher than about 100 ppm in your recirculating solution.

How do you stake a tomato plant with the DWC system?
Hi John,
I do not stake my tomatoes but have a framework over them to which I tie string.
Loop the lower end around the bottom of the plant and then wind it up the stem, not tightly, then tie the other end of the string to the framework. As the plant grows you twist it carefully around the string. Works well. I grow my plants to 8ft this way.